How to Draw Pleats in Fashion Illustration: Knife, Box, and Accordion Folds
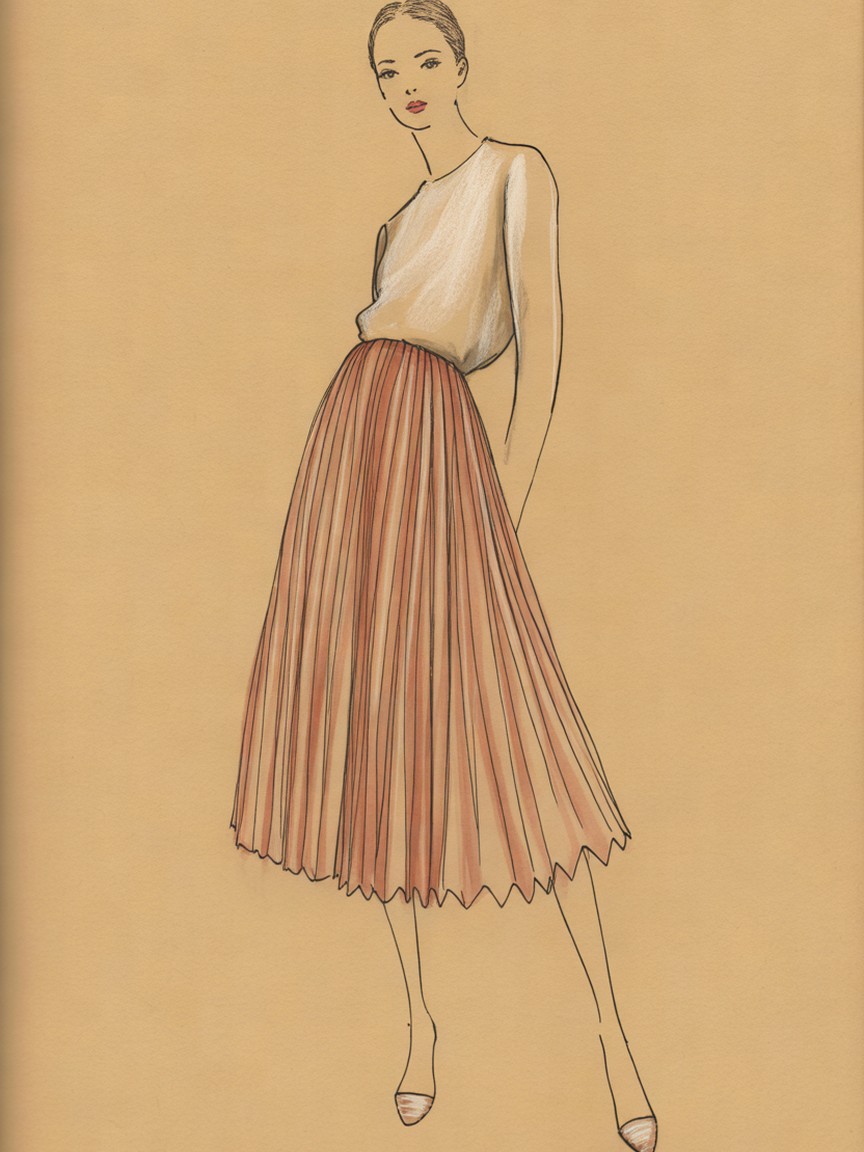
A pleated skirt can look wonderfully simple until you try to draw it. A few repeated lines should be enough, yet the result often resembles a striped lampshade. The missing ingredient is volume: every pleat has a face, an edge, and a fold that turns away from the light. Once you draw those relationships, the garment starts to move.
This guide takes you from a folded paper study to a finished fashion illustration. You will practice knife, box, and accordion pleats, then adapt their rhythm to a body in a relaxed pose. Start with pencil and one grey value. Color can wait until the structure makes sense.
Study a Fold Before Drawing a Skirt
Fold an ordinary sheet of paper back and forth into a small concertina. Stand it on a table beside a window. Notice that the surfaces facing the window stay bright while the surfaces turning away become darker. The deepest creases may hold narrow dark accents, but they are not all equally black. Turn the paper and watch the value pattern change.
Make three small sketches of that paper: one showing only the outer contour, one showing the fold edges, and one using three values without outlines. This separates silhouette, construction, and light. It also reveals why a row of identical vertical pen strokes cannot fully explain a pleated garment. The strokes describe divisions, but they do not show which surfaces come forward.
Paper is a useful model for sharp folds, although fabric usually softens and bends more. After the paper study, drape a pleated garment over a chair or study a clear reference photograph. Look for places where the pressed structure relaxes below the hip, opens at the hem, or disappears behind another fold.
Choose the Pleat Family
Knife pleats: a repeated directional rhythm
Knife pleats fold in the same direction. In a simple front view, think of a series of overlapping panels rather than independent stripes. Draw a broad visible face, a narrower return, and the next face. The exact proportions depend on the garment and viewing angle, so observe the reference instead of applying one fixed formula to every skirt.
Keep the fold direction consistent across your study. If some pleats suddenly face left while their neighbors face right, the construction becomes confusing. At the sides of the figure, the visible faces usually narrow as they turn around the body. Let some edges disappear into the side contour rather than squeezing every fold into view.
Box pleats: broad faces with folded depth
A box pleat presents a broad outward face formed by opposing folds. Establish that broad panel first, then indicate the tucked fabric at either side. It should feel like a surface with depth behind it. Avoid drawing a dark rectangle down the middle of every panel, which can make the skirt resemble patchwork.
A real box-pleated skirt may have folds stitched down for part of its length. If your reference shows this, keep the upper section controlled and allow the fabric to open below the stitching. That transition gives you a useful visual story: the garment is held near the body, then gains room to swing.
Accordion pleats: small planes with a lively edge
Accordion pleats create a repeated back-and-forth structure. Begin with a few larger guide folds so the overall direction stays organized, then suggest smaller folds between them. You do not need to count every pleat in a photograph. You need enough information to communicate the fine, regular rhythm.
The hem can help explain this structure. In a clear close view, small changes of direction reveal where the fabric folds forward and back. At the scale of a full fashion figure, simplify those changes into a few crisp accents. An equally sharp sawtooth all around the hem can make soft fabric look like cardboard.
Draw the Silhouette Before the Detail
Choose a calm standing croquis for your first attempt. Lightly mark the waist, hips, knees, and supporting leg. Sketch the skirt as one complete shape, including its widest point and hem. Ask whether it hangs close to the body, forms an A-line, or flares strongly with movement. Resolve that before adding a single pleat.
Leave room between the legs and the garment outline. A pleated skirt contains extra fabric, and its silhouette does not need to trace every anatomical landmark. The supporting hip can influence the upper shape, while the lower skirt hangs more freely. If your drawing feels tight, erase the internal detail and check the outer shape again.
For help placing the body under the clothes, revisit our guide to fashion poses and the line of action. A clear balance point will make the skirt's response to the pose easier to understand.
Map Five Main Folds
Mark a center fold and two guides on each side. These are planning lines, not a promise that the finished garment has only five pleats. Use them to establish direction from waist to hem. On a flared skirt, the gaps can widen toward the bottom as the folds open. On a narrow hanging skirt, the paths may remain closer to parallel.
Next, follow the body's turning surfaces. Near the center front, more of each pleat face is visible. Toward the side, those faces turn away and appear narrower. This change should be gradual. A broad central panel beside a suddenly tiny one will look accidental unless the pose or garment construction explains it.
Add secondary fold lines only after the main guides agree with the silhouette. Lift your pencil before every line and decide where it belongs. Some folds will run almost the full length; others will soften or vanish. A broken edge can describe cloth more convincingly than a continuous line from waistband to hem.
Use Three Values to Build Depth
Pick one light direction and keep it consistent. With light coming from the upper left, test which planes face that light using your folded paper model. Reserve the paper for the brightest faces, place a light or middle value on turning surfaces, and use your darkest tone sparingly inside selected creases and overlaps.
Do not assume every second panel must receive the same shadow. The skirt curves around a body, so the lighting changes across its width. Start with the larger shadow family on the garment, then describe individual folds inside it. This lets the viewer read both the roundness of the skirt and the smaller pleated structure.
Keep a clean boundary where a sharp pressed fold turns away. Where fabric relaxes, soften or interrupt that boundary. The contrast between crisp and lost edges tells the viewer more about the material than extra shading everywhere. Step back frequently: the skirt should remain legible when the page is viewed at arm's length.
Show Movement Through Uneven Spacing
For a walking pose, decide which part of the skirt is being pushed outward by the advancing leg. Open the fold spacing there, compress it where fabric bunches, and let the hem rise or swing according to the reference. The fold paths should respond to the same movement rather than behaving like separate decorative ribbons.
Keep the waistband anchored to the pelvis. A common mistake is to tilt the whole skirt dramatically while leaving the waist and torso perfectly level. Trace the forces through the drawing: the waist holds the garment, the leg displaces it, and gravity pulls the free fabric downward. You can exaggerate the gesture while preserving those connections.
Our fabric movement tutorial offers another way to practice those relationships. For this exercise, limit yourself to one clear swing of the skirt. Several competing directions can overwhelm the pleat rhythm before you have established it.
Add Color Without Losing the Fold Pattern
Choose a restrained midtone such as terracotta, dusty blue, or olive. Test your tools on a scrap of the same paper, especially if you plan to combine ink with wet color. Some pens bleed under washes, and some papers make marker strokes spread farther than expected. A small test protects the drawing you have already built.
Lay a light base across the skirt, leaving a few highlight faces open. Let a watercolor layer dry before deepening selected fold shadows. With colored pencil, build value using light pressure and strokes that follow the fabric's length. With markers, work in a small number of deliberate passes rather than scrubbing repeatedly over the same area.
Keep the deepest accents concentrated. A few narrow dark creases near the waist or inside an overlap can establish depth without turning every fold into a black stripe. If the skirt becomes busy, simplify the blouse and background. The pleats need visual space around them to remain the focus.
Fix the Four Most Common Problems
- The skirt looks striped. Replace some outlines with changes of value. Make visible faces and returns different widths, guided by the reference.
- The fabric looks rigid. Soften selected edges below the hip and vary the hem. Keep sharp folds where the garment actually holds them.
- The body looks flat. Compress the pleat spacing toward the sides and recheck the larger light and shadow shapes.
- The detail overwhelms the figure. Remove secondary lines, reduce dark accents, and preserve one clear silhouette.
A Twenty-Minute Practice Page
Spend the first five minutes folding and sketching paper. Use the next five for three small skirt thumbnails: knife pleats, a box pleat, and accordion pleats. Keep all three in the same simple standing pose so you can compare their structures without solving a new figure each time.
Choose the clearest thumbnail and spend ten minutes enlarging it. Draw the silhouette, place five guide folds, add secondary folds selectively, and finish with three values. Write a short observation beside your practice drawing about what worked. On your next page, change either the pose or the material while keeping the other familiar. That makes progress easier to see.
Further study: the University of Fashion's drawing design details overview points to accordion-pleat demonstrations. For broader shape experiments, the V&A's fashion activity explores folds, drapes, pleats, and cones. Use those as starting points, then return to observation of your own folded paper and garments.
Supplies for Your Pleat Practice
Fine Line Detail
Sakura Pigma Micron pen set offers fine tips for selective fold edges and heavier silhouette accents. Test the ink with your chosen coloring medium.
Light Construction
Prismacolor Col-Erase pencils can help separate the first garment shape from the final fold pattern. Keep the underdrawing light.
Value Studies
Staedtler Mars Lumograph pencil set gives you a range of graphite grades for testing bright faces, turning planes, and deeper creases.
Practice Paper
Canson XL Mix Media pad provides a surface for pencil and light mixed-media studies. Test wet washes on a spare area first.
Give Your Pleats a Confident Figure
Our Fashion Croquis Template Sketchbook: Paris Edition gives you 300 pages of light grey 9-head figure templates with scenic Paris backgrounds. Use a ready figure to focus your practice on silhouette, pleat direction, and fabric movement.
Get the Paris EditionSome links above are affiliate links. If you purchase through them, we may earn a small commission at no extra cost to you. Choose supplies that suit your paper and preferred drawing medium.